 Rob
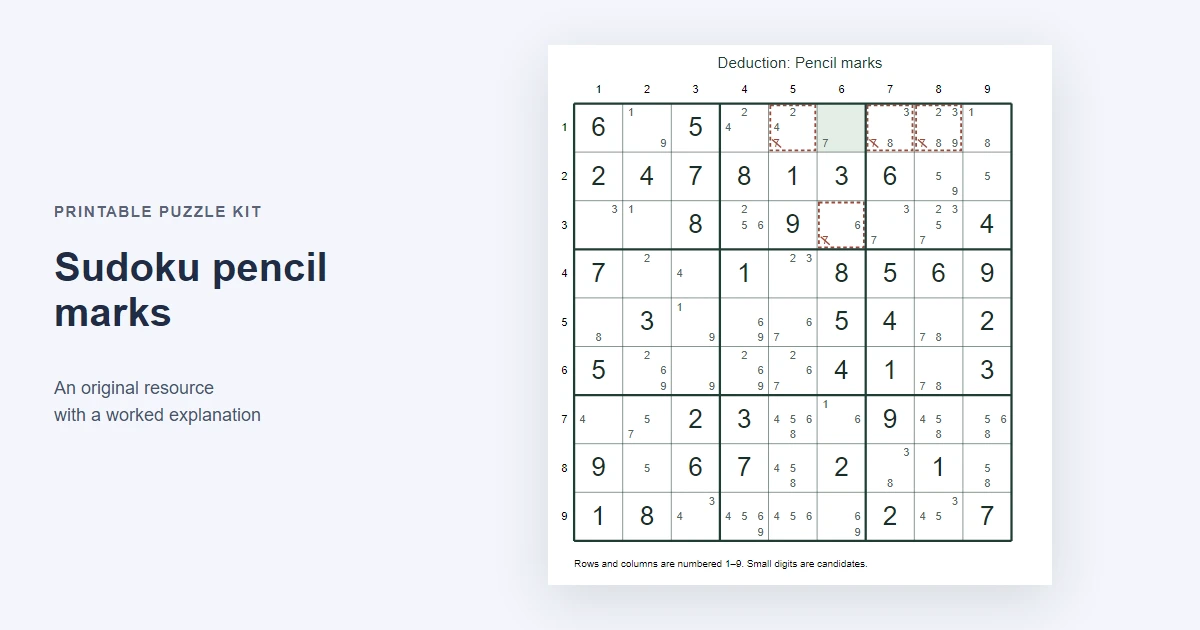
Sudoku pencil marks are small notes showing which digits are still possible in an empty cell. They help you keep track of exclusions instead of remembering every row, column and box while solving. A candidate is a possibility, not a guess you have decided to treat as an answer.
Open the original pencil-mark practice pack. It includes a starting puzzle, a complete candidate diagram, one marked deduction, the updated diagram and the matching solution. The puzzle has exactly one solution, checked independently from the generator. You can work through the specific example below before trying the rest.
Read the cells and the notes
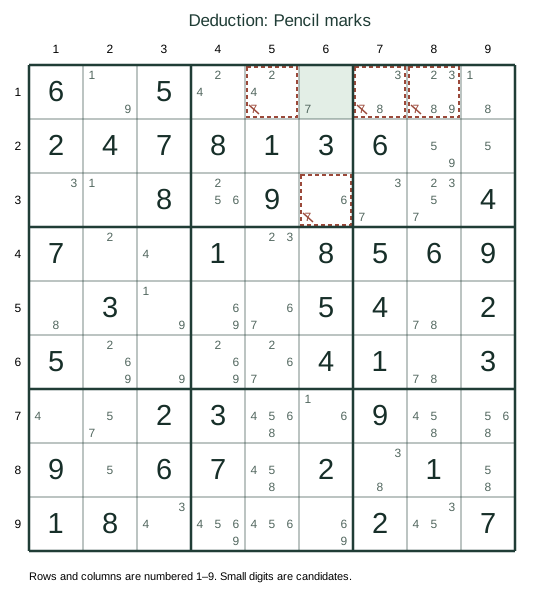
Rows run from top to bottom and columns from left to right, numbered one to nine. The name r1c6 means row one, column six. The heavier lines divide the grid into nine three-by-three boxes. A standard Sudoku requires each row, column and box to contain the digits one through nine once each.
The terminology follows the usual distinction between starting digits, possible candidates and cells that share a row, column or box; HoDoKu’s introduction explains these terms. Our diagrams use large digits for placed values and small digits for candidates. Cells that share one of those groups are also called peers.
The small digits occupy consistent positions inside each cell. One, two and three are along the top; four, five and six in the middle; seven, eight and nine along the bottom. That arrangement makes it easier to notice the same candidate across several cells without reading an irregular handwritten list.
Build a complete candidate list
The Sudoku difficulty guide explains how singles, pairs and locked candidates determine this site’s level labels. Keep the notes complete before using a technique that depends on all remaining possibilities.
Choose an empty cell and consider the digits one through nine. Remove any digit already placed in its row, then remove any already placed in its column and box. The remaining digits form the initial candidate list for that cell.
Check all three groups even when one seems informative enough. A digit missing from the row may still be excluded by the column. Likewise, a digit missing from both the row and column may already appear elsewhere in the box. A complete list combines all three restrictions.
Do not remove a candidate merely because the same small digit appears in another cell. Small notes are unresolved possibilities. Several cells in a row can initially contain a candidate seven even though only one will eventually hold the placed seven. A logical deduction is needed to narrow them further.
Worked example: why r1c6 must be seven
Checked candidate changes in this teaching state
| Cell | Before | Remove | After |
|---|---|---|---|
| r1c5 | 2, 4, 7 | 7 | 2, 4 |
| r1c7 | 3, 7, 8 | 7 | 3, 8 |
| r1c8 | 2, 3, 7, 8, 9 | 7 | 2, 3, 8, 9 |
| r3c6 | 6, 7 | 7 | 6 |
Open the “before” diagram and find r1c6. In the starting puzzle, row one already contains six and five. Column six contains three, eight, five, four and two. The upper-middle box contains eight, one, three and nine. These placed digits rule out every digit except seven at r1c6.
Combining the exclusions gives the set one, two, three, four, five, six, eight and nine. Seven is the only remaining candidate. You can therefore place seven in that cell without choosing between alternatives. This one-candidate situation is commonly called a naked single.
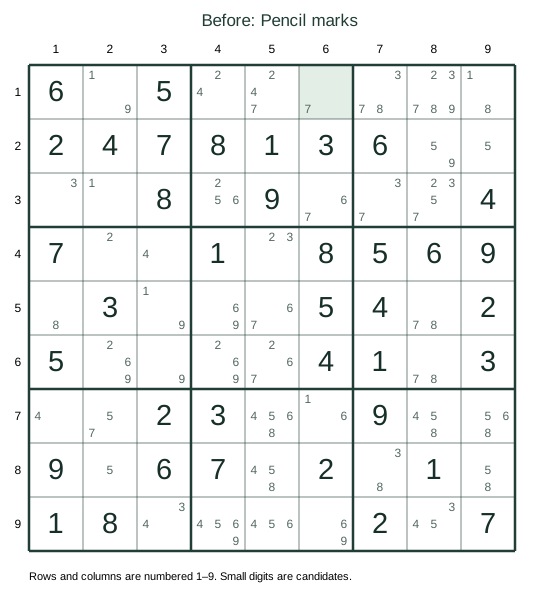
Before writing the large seven, repeat the check yourself using the visible givens. This is a useful habit when learning notation: the mark is a record of your reasoning, not a substitute for understanding why the digit fits.
Update the affected pencil marks
Once seven is placed at r1c6, no other empty cell in row one, column six or the upper-middle box can contain seven. Remove that candidate from those peers. Do not remove seven elsewhere in the grid unless the cell shares one of these groups or another deduction justifies it.
In this particular starting state, four other cells contain a seven that must be removed: r1c5, r1c7, r1c8 and r3c6. The marked diagram crosses out exactly those candidates. The coordinates are listed here as well so the explanation does not depend on colour alone.
Before the placement, r1c5 has candidates two, four and seven. It becomes two or four. r1c7 has three, seven and eight, so it becomes three or eight. r1c8 has two, three, seven, eight and nine, so it becomes two, three, eight or nine.
The fourth change produces another immediate deduction. r3c6 begins with six and seven; removing seven leaves six alone. You can place six there next, then update its own peers. The printable “after” page stops after the first seven and its candidate removals so you can identify this new single yourself.
Keep solved values and notes visually distinct
Write a solved digit clearly in the centre of its cell and erase the small notes in that cell. A mixture of a large answer and several old candidates makes it difficult to tell which information is current. Then update the affected peers before searching for another pattern.
If you use pen for the puzzle’s original givens and pencil for your own placements, keep the distinction consistent. You do not need elaborate colours. Readability matters more than a decorative system, particularly when several candidate changes happen in succession.
For digital solving, learn whether the tool automatically removes candidates after a placement. If it does, check the result while learning so you still understand the change. If it does not, a placed digit can leave stale notes elsewhere until you update them manually.
Full notes and selective notes answer different questions
A full candidate grid records every currently allowed digit in every empty cell. That is the format used in this practice pack. It supports comparisons such as finding a cell with only one candidate or checking where a particular digit can go within a row.
Some solvers instead note only a few possibilities or mark candidate locations for one digit at a time. That can be a useful personal shorthand, but it must not be mistaken for a complete candidate list. Two written digits do not prove a naked pair if other possibilities were simply left unwritten.
If you switch from selective notes to a full-grid technique, complete the relevant notes first. Label a practice sheet if the notation is deliberately partial. Many apparent contradictions come from forgetting what the notes were intended to represent.
What to check when a cell has no candidates
In a valid unfinished puzzle state, each empty cell must still have at least one possible value. If your notes leave none, pause. You may have copied a given incorrectly, placed an unsupported digit, removed a candidate from a non-peer or forgotten to include a valid possibility.
Compare the cell’s row, column and box with the original puzzle. Check your most recent placement and the notes changed after it. If you have a short record of deductions, return to the last state you can justify rather than filling the empty cell with a guess to make the problem disappear.
Distinguish a notation error from a defective puzzle. The downloadable example has a separately checked unique solution, so an empty candidate list during this exercise indicates a mistake in the current working state. For a puzzle from another source, uniqueness cannot be assumed solely because it looks like a standard grid.
Practise the update loop
- Confirm r1c6 has only candidate 7.
- Write 7 as a solved value, distinct from pencil marks.
- Remove 7 from its peers where listed in the checked table.
- Recheck affected groups before looking for the next deduction.
When you resume a puzzle after a break, check the last placed digit before making a fresh deduction. If you stopped between placing it and clearing its peers, the notes may describe two different states at once. A small mark beside the last completed update, or a short note in the margin, can identify a reliable restart point without altering the puzzle itself.
Count shared cells only once when updating. A cell can share both a row and a box with the new digit, but deleting its candidate twice has no additional meaning. Work through the row, column and box systematically, checking that each affected empty cell still has a coherent candidate list.
Print the original puzzle page and fill candidates for row one. Check each empty cell against its column and box. Compare your notes with the supplied complete diagram only after making your own list, so the comparison reveals the specific exclusion you missed.
Next place the seven at r1c6 and update the four listed peers. Find the resulting single at r3c6. Before placing its six, identify all the cells that share its row, column or box. This rehearses the same rule with a different set of peers.
Continue from there or return to the full “after” page if your handwriting becomes crowded. The aim of this exercise is an accurate chain of small deductions. Speed is optional, and the answer sheet can stay separate until you want to check the completed grid.
Where pencil marks lead next
When two cells in one group contain the same two candidates and no others, you can investigate a naked pair. When two digits can occur only in the same two cells of a group, even though those cells have extra notes, the relevant pattern is a hidden pair. Both depend on knowing whether the candidate information is complete and current.
You can also compare the possible locations of one digit between a box and a line, as in locked candidates. Learn one pattern at a time and state the reason for each deletion. A crossed-out note should always have an explanation you can reconstruct.
Printing the practice pack
The resource contains five separate pages: before, marked deduction, after, original puzzle and solution. Choose A4 or Letter portrait and inspect the print preview. Turn off browser headers and footers if they crowd the page. Print only the original puzzle and solution if you want a clean attempt without candidate hints.
The vector diagrams remain sharp when enlarged, but the small candidate digits need enough physical space. If your printer scales the page down, check readability before printing several copies. Use the on-screen diagram at a comfortable zoom when that is easier to read.
The generator and a separate exact-cover checker agree on the solution. The four candidate removals shown in the example were also checked by forcing each removed value and confirming that no valid completion remained. Those checks support this particular resource; they do not replace the step-by-step reasoning you can verify directly on the page.